Saturday, 28 March 2015

Gothic

This post will be a short introduction to the Gothic.

But first have a look at this awesome Vine I found.

Hmm I actually wanted to post the video directly into this post but I can't figure out how.
So just click this link.

Gothic is very broad as they are Gothic literature, Gothic art, Gothic architecture, Gothic horror and then all those many subcultures when it comes to Gothic 'fashion'.
And I think I could spent hours here writing about everything which I don't want to do:) 

That's why I decided to only talk short about each category and just give some examples.

Gothic Literature:
  • the Gothic fiction is largely dominated by the Gothic horror genre
  • Gothic horror combines most of the time romance and horror, gives the reader a certain thrill
  • leader in the Gothic horror fiction was Horace Walpole with his novel 'The castle of Otranto' from 1764
  • other famous author's were: Mary Shelley- Frankenstein, 1818; Bram Stoker- Dracula, 1897; Ann Radcliffe- The Mystery of Udolpho, 1794; Emily Bronte- Wuthering Heights( I love this novel by the way), 1847; Oscar Wilde- The Picture of Dorian Grey, 1890; Robert Louis Stevenson- Strange Case of Dr. Jekyll and Mr. Hyde, 1886; Anne Rice- Interview with the Vampire, 1976; Patrick McGath- Asylum, 1996, Charles Dickens- Great Expectations. 1861  and of course Edgar Allen Poe- The Masque of the red Death, 1842 ( and of course many many more)
I found these images from 'The Guardian' which tell the important key points of Gothic horror novels

Gothic novels: The villain is a  murderous tyrant
Gothic novels: The heroine is pious
Gothic novels: It's set in a spooky castle
Gothic novels: There is (probably) a ghost or monster
Gothic novels: It's set in the olden days
Gothic novels: It takes place in foreign parts
Gothic novels: The weather is always awful
Gothic novels: Anyone who isn't a white, middle-class Protestant is frightening
Gothic novels: The laws of the land are brazenly flouted
Gothic novels: People talk funny
Gothic novels: So which Gothic novels are the best?
all images are taken from here

  • the key points of Gothic horror are: the uncanny, sexual power, crisis, the sublime, the supernatural and the real(ghost, vampire, other supernatural creatures), strange places/haunted houses/ Gothic architecture, terror vs horror, death, mystery, darkness
  • Gothic authors got their inspiration from the medieval times, superstitions, rituals/occult, dark fantasies
  • mostly set in the past and women are mostly the target

Gothic Architecture:
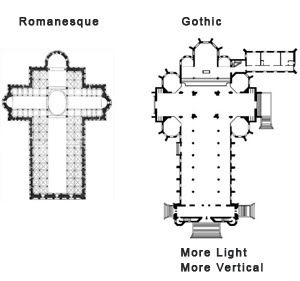
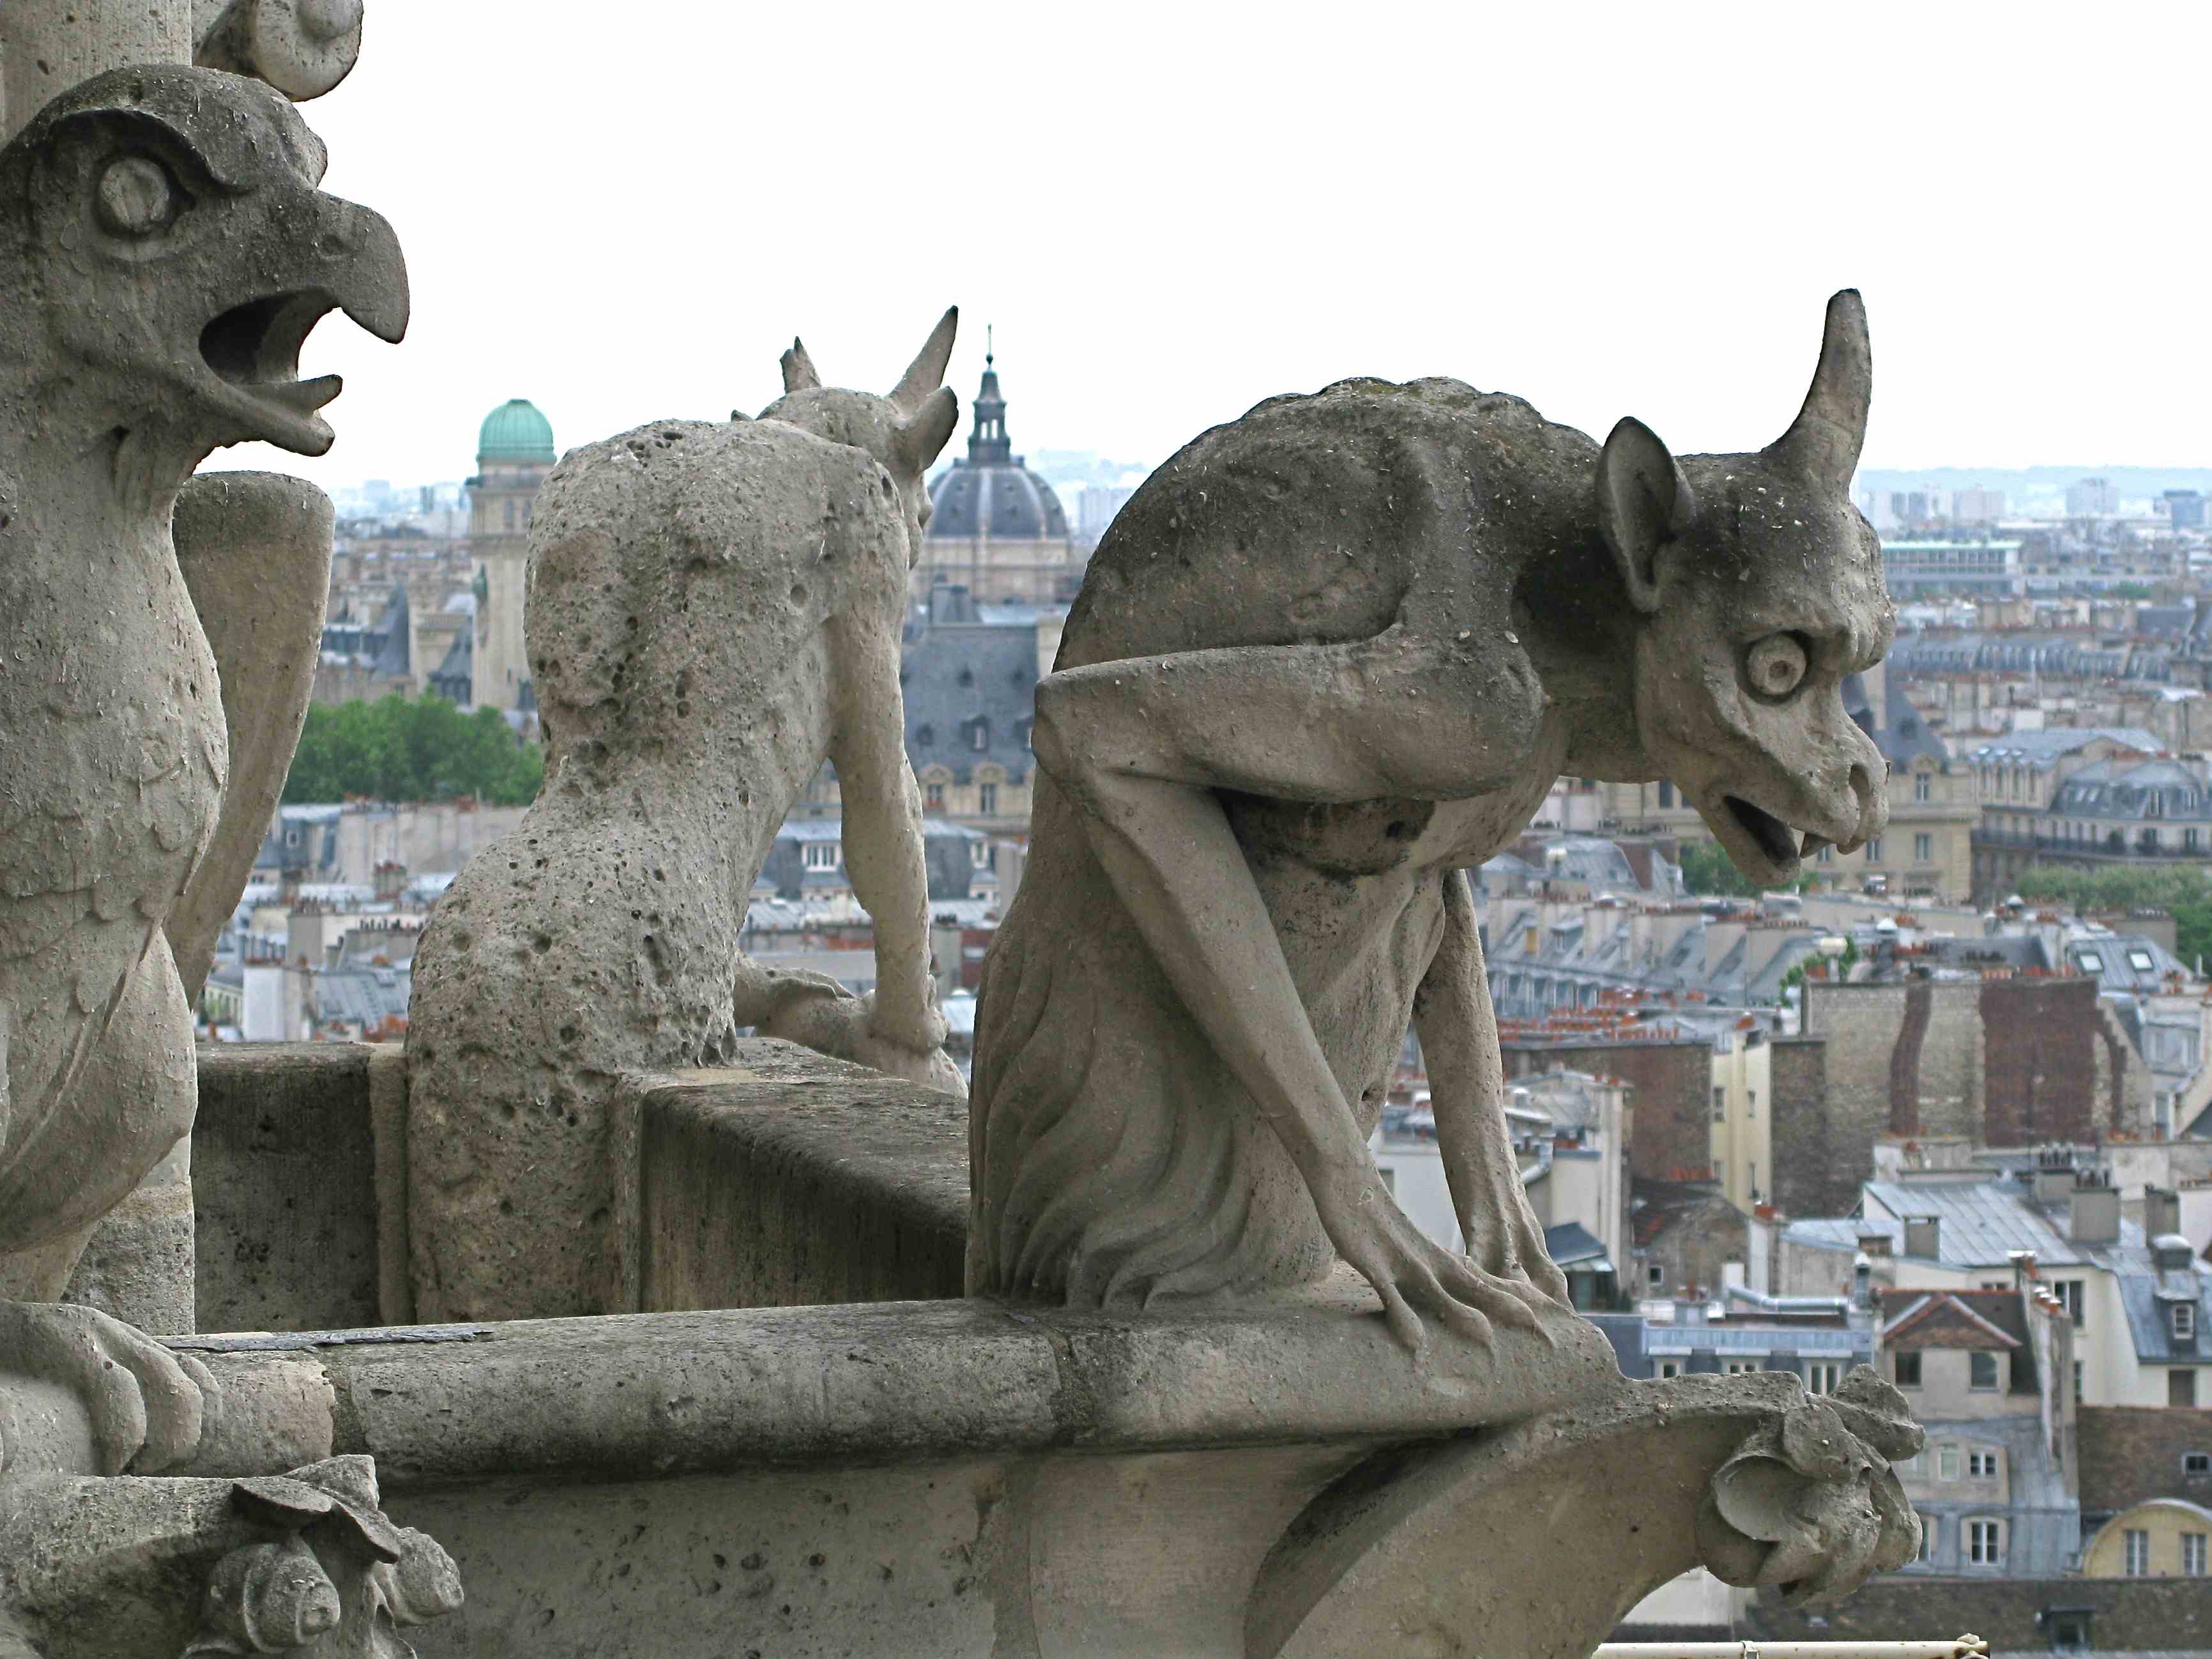
  • key points of Gothic architecture: flying buttress, pointed arch, ribbed vaults, rose window, spire, at least one tower-often more- and of course gargoyles.
Gargoyles


  • Gothic architecture in London: Big Ben, Palace of Westminster, St Pancras railway station, West Norwood cemetery and a lot of churches like the Sacred Heart church in Wimbledon or St Luke's church in Chelsea
  • other famous Gothic buildings: Rheinstein castle in Germany, Notre Dame de Paris, Notre Dame de Reims
  • evolved from Romanesque architecture and had its peak time during the mid-late medieval times
  • originated in France in the 12th century and lasted into the 16th century
  • the Gothic architecture during the Victorian time would later be called Gothic revival architecture

Goth Subcultures:
  • this page has a nice and very cute overview of  the different subcultures within the Gothic
  • when I started to have a look at it I didn't even know where to start as it is so broad and I had no idea that there were so many different sub genre as I only new the 'stereotypical Goth'
  • here are some  sub genre I found on the already mentioned website: Medieval Goth, Hippie Goth, Vampire Goth, Mopey Goth, Tribal Goth, Romantic Goth, J-Goth (Japanese Goth) and of course the Victorian Goth
  •  the Goth subculture is a contemporary subculture and established in the 1980's in England, with he start of Gothic rock
  • a thing I also found while looking through the Goth subcultures was the fashion part, especially Haute Goth-> Karl Lagerfeld hosted in 1977 the Soirée Moratoire Noir party, specifying "tenue tragique noire absolument obligatoire" 
  • but also designers such as Alexander McQueen, Rick Owens, John Galliano, Christian Lacroix, Philipp Plein, Thierry Mugler and Jean Paul Gaultier brought Gothic elements on the catwalk shows
Gothic Music:
  • it is quite hard to find exact facts about Gothic music but it all started with the Gothic Rock which is a subgenre of alternative rock and post- punk
  • established in early 80's late 70's
  • origins are England and Germany 
  • because I don't know much about Gothic music I had a look at the 20 best Goth records and I can't believe what I found. One of my favourite tracks! Haha I didn't know it was Gothic because I heard the song first in the Movie Elvis & Anabelle (starring Blake Lively  ♥-  I love her so much ^^). But yes as I am thinking about the movie now the movie definitely goes in the "Gothic Horror"( it is not a horror film but has key points of it ) direction as well. 
So therefore my first Gothic song will be 

Bauhaus- Bela Lugosi's Dead

 And here is the version from the Elvis & Anabelle film
Bela Lugosi's Dead by Nouvelle Vague 

And because this movie is so underrated I am gonna post a trailer to the movie here.
So go on and check it out! :D

Now back to Gothic music

Next one is
Joy Division and the Closer Album

The Cure- Faith (single)

Sisters of Mercy- Alice

Xmal Deutschland- Incubus Succubus 

The Danse Society- There is no shame in Death

I found those songs on the factmag.com website

But I think as there are so many different Goth subcultures , it depends really in which Goth subgenre you are when it comes to Goth music. I bet there is a huge variety as well. I just remembered Nightwish was also 'quite' popular and I think they are also Gothic.

Gothic Horror Films:
  • I think when it comes to Gothic horror films Tim Burton is definitely in the first ranks, I seriously love his work-> Sleepy Hollow (1999), Beetlejuice (1988), Edward Scissorhand          ( 1990), Sweeny Todd( 2007), Abraham Lincoln- Vampire Hunter (2012) 
  • Bram Stocker's Dracula directed by Francis Ford Coppola (1992)
  • Mary Shelley's Frankenstein directed by Kenneth Branagh (1994)
  • Dread directed by Anthony DiBlasi ( 2010)
  • Nosferatu directed by F.W. Murnau (1922)
  • The Women in Black directed by James Watkins (2012)
  • The Orphanage directed by Juan Antonio Bayona ( 2007)
  • Rebecca directed by Alfred Hitchcock (1940)
I found a good video on YouTube which explains the history of horror films


Then I was thinking about Gothic in music videos. Of course this could be part of the Goth music but I found a few music videos were the band is not doing Goth music but  have Gothic key points in their music Videos. At least I think they are kind of Gothic looking :)

Let's start with one of my favourite bands
RAMMSTEIN 
Is a German Neue Deutsche Härte/ industrial metal band and was founded in 1994.
I literally grew up with them as my dad is a huge fan as well and we were listening to them all the time. Even though I wouldn't suggest to let small children listen to their music :D

First song 
Rammstein- Ich Tu Dir Weh
Rammstein- Engel

Then there is also the Korean boy band Vixx . They had several music videos now which were kind of dark. Also the settings and concepts reminded me of Gothic.

Vixx- Hyde (the album was actually called Jekyll and Hyde- uhhhh! ^^)

Vixx- Voodoo Doll

김재중-MINE

source

I also find that in a lot of J-Rock(Japanese rock) music videos the setting and clothes/makeup are very Gothic inspired.


Friday, 20 March 2015

Creating wounds using molds

->good for continuity
->can do all shapes of scars and wounds
->use non porous mold


You will need:
  Pros – aid (glue for sticking on prosthetics)
·         Pro clean ( pros- aid remover)
·         Barrier foam/cream
·         Translucent powder, Illamasqua, or baby powder
·         Kryolan super colour
·         Wound filler
·         Blood
·         Kryolan ultrafoundation
·         Witch hazel, cleanser, moisturizer
·         Baby buds


·      ->   Before applying gelatine or latex apply barrier foam
·     ->    Gelatine and pros- aid are good for people with sensitive skin, most of people are highly unlikely to be allergic to it
·     ->    Petrolease(spray)- you spray it in mold before  putting the gelatine in it, you can also use Vaseline
·      ->   Apply pros- aid on the mold as well as on the part of skin where you want to apply it
·      ->   Make sure to wait until it is clear otherwise it won’t stick on properly
·      ->   Also make sure to apply glue on all the edges as well
·        -> When glue is clear stick it on skin and press it down hard, especially around the edges
·      ->   The apply witch hazel on a baby bud and melt down the edges, so it will blend in with skin, take your time doing it
·     ->    When done powder
·        -> To thin down colours mix it with cleanser or moisturizer
·      ->   Colours have to look translucent and NOT fake!
·       ->  Don’t press down the mold with a cotton pad, it will stick to adhesive and you have fizzy bits on it then, use rather a tissue
·      ->   Once the mold is powdered you can start colouring, colour in the mold how you want it to be
·      ->   I did a gunshot so I applied some of the 079 and 081 from the Kryolan super colour into the center and blended it out a bit, then I mixed 071 and 081 and applied it around the center
·       ->  Then you can fill in with wound filler
·       ->  If the mold has same skin colour as the person you are doing it on you don’t need to use foundation to match skin colour, otherwise do it before you start colouring
·       ->  At last you can apply the blood

·      ->   depending on what kind of  wounds you are doing you can also apply Vaseline for shine


->I noticed that while I was melting down the edges with the witch hazel the mold fell apart/crumbled apart instead of blending in really-> so I started powdering it in between and then blended again, then powdered again, blending in, powdering, blending in-> that worked better


Sunday, 15 March 2015

'What the Dickens...' project evaluation


I definitely had my high and lows during the ‘What the Dickens..’ project. I originally choose my partner because she had very long/thick hair and I thought that’s perfect to work with and you can do so much more with it, than with someone who has short hair which is true but I did not foresee the problems I would have with the hair during the Estella assessment. Everything was fine for the Miss Havisham design as I had almost all of the hair up into a huge bun but for Estella I wanted to do a mid-late Victorian hairstyle were the curls are coming down in cascades. But during the practice I realized that because her hair is so long and thick it is too heavy for the kind of curls I wanted to stay in. Also it took me almost 2 hours to curl all of the hair( and in the end it didn't look like my design), so I panicked that I would not be able to finish in the time we only had. But luckily Lottie went over my designs(on the day of the assessment!) with me and gave me tips on how to manage with the time and what to do with such long hair. In the end I was quite satisfied with my Estella assessment even do I was in a very bad mood during the assessment because I was still panicking. But overall I found the brief very interesting and fun to do as I am a fan of the Charles Dickens novels. I think I learned a lot during that time especially when it comes to how to create ageing, wounds and other sort of illnesses. It was also a challenge because we had to keep the designs historical and were kind of limited with our designs.

Friday, 13 March 2015

Creating Estella: Assessment


Estella Design step by step

Consultation Notes


MAKE UP

NOTE: Blusher on face chart is a bit to dark, want it to be more subtle 


Keep it natural!!
Products:
Etude House BB Cream Blooming
Rimmel London wake me up 003 peach glow
Benefit cha cha tint
Illamasqua power blusher duo
H&M eyeshadow palette
Illamasqua Translucent powder
Brushes
Eyelash curler


Apply BB cream and blend well-> natural look, basic coverage
Apply a peachy eye shadow from the H&M eye shadow palette, not too bright!!
Use Rimmel London wake me up peach glow and  apply on cheeks to give a fresh look
Apply Benefit cha cha tint on lips
Curl eyelashes

HAIR


Products:
Brush
Pin tail comb
Sectioning clips
Pins
Hair band
Fresh flowers
Hair spray
Heat protection


Apply heat protection
Brush hair well, you don’t want any knots when you start curling
Front: first create a big section to the ears
Curls horizontally -> 2 rows
Curl vertically -> around 2 rows as well
Before you curls spray hair spray on hair for a better hold-> her hair is extra-long and thick!!
Back: create a bun( twist and plait), curl the rest of the hair and place it randomly on the bun( so you can’t really see the bun anymore, curls should be ringlets
At the neck area do nice ringlets-> remember to twist tong in a parallel angle when you curl!
Take section from front to the bun a s well-> vertical curls: take them back very sleek an pin in, Horizontal curls: create a little wave at the top and pin them back as well
Lastly place in the fresh flowers


->NOTE: I just changed the created this hair design on the morning of the assessment day because I had trouble with doing my actual design because Anna Maria has such long hair. So I wasn't sure if it would work out but I quite like the outcome. I just messed up the ringlets quite a bit. Even though I curled them in the right angle they didn't look like ringlets. Maybe I did something wrong when releasing the curl?

Tuesday, 10 March 2015

Creating Estella: Practice


MakeUp:


On the day of the practice I just tested if the Etude House BB cream will suit Anna Maria's skin tones as her skin is a bit darker and the BB cream makes her skin quite white. But I wanted to use BB cream because it still looks natural and I was worried that if I use proper foundation it doesn't look that natural anymore. Luckily the BB cream was fine on her skin. I didn't practiced anything else regarding the makeup on that day as I was running out of time.


Hair:


.

That was the hair design I actually wanted to do but a lot went wrong during the practice.
I did a middle parting and created a section on each side which will be curled. At the back I had 2 main section. A really big one for the curling and a small one at the neck where the hair would be curled into ringlets. Front: I sectioned the main section on each side into 3 little section and curled the hair horizontally. Pin the curls down and let them cool down. At the back: at the back I just curled all of the hair which took forever and was the main thing which made me fail my practice. When I choose Anna Maria as my model I thought her very long her would be good to work with and it was for my Miss Havisham design but it was way more difficult for the Estella look. Especially because I wanted to do a late Victorian look which involves a lot of curling but I only had a certain amount of time during the assessment. I took me 2 hours to curl everything and finish my look but then I saw that it looked a bit funny. I think I placed the curls wrong at the back of the head and also placed the curls from the front section wrongly. This made my look rather wedding like looking than Victorian. But I talked to Lottie and she said that this can happen quickly when doing Victorian hair. The wedding hairstyles evolved from the Victorian hair so it can happen that they look a bit similar. But for myself the practice was a huge fail but it also showed me what I have to change and that I should have thought about how to handle so much long hair before designing.


It looks like she has a birds nest on her head T^T..But yes it is obvious that the end result images don't look like my hair design. Afterwards I decided to use a different model with shorter hair but I wasn't allowed to. So I sat down in the morning at the day of the assessment and went through my new designs with Lottie and she gave me some tips on how to handle the situation and how to work with that much hair. As you could see in my Estella hair design post I developed my hair design and decided to do a big bun first to get rid of a lot of hair and then place the curls on the bun to hide it. I also changed the way I placed the curls because when I did the practice I kind of rolled the curls into pin curls and then pinned them down. This time I placed them more loosely. I also looked up what I did wrong with the front section during practice

Friday, 6 March 2015

Creating Miss Havisham: Continuity Assessment

Miss Havisham step by step

Consultation Notes


Products used:
Hair kit; brush, pin tail comb, sectioning clips , hair pins and bands
Heat protection
 hair spray
Brush kit
Kryolan foundation palette->Alabaster
Illamasqua skin base
Kryolan Viva Brilliant Colour Medley Matt Sun eye shadow palette using caraway, white pepper, sage blossom
Chanel Base Lumière
Duo glue
Pipette
Grey pigment from Studio
Water
Dried rose petals
Self-built birds nest
Veil
Dried rose bouquet
Lip stain 01 from Essence
Illamasqua translucent powder
Make up Revolution London Salvation Palette-> run boy run, head start
Baby powder
Kryolan super colour palette
Lace necklace

MAKE UP


Make sure face is clean!
Apply Chanel lumière base
Mix a very light but not too white base using Illamasqua skin base and Kryolan Ultrafoundation palette in Alabaster
Apply base, blend very well-> don’t forget to do neck and décolleté as well
Powder with Illamasqua translucent powder
Using Caraway from Kryolan eye shadow palette do contouring
Create an ill/ sick looking look
Apply Caraway also under eyes, add white pepper(parallel to nose), sage blossom (especially in inner corner of eye) and run boy run to create dark circles
Apply a red( either from super colour palette or the MURL Salvation palette) on the waterline
Use run boy run on eyelid
Apply a bit of Head start(black) near the waterline
The using the pipette create run down tears to create tears mix water with the grey pigment-> shake well!
Curl eyelashes, no mascara!
Apply duo on lips, let it dry and then pick up bits di create dry lips
Apply lip stain or 081 super colour on lips to create the effect that she is/was biting her lips
Stick rose petals on her face
Stick some of the petals on her  décolleté


HAIR


Apply heat protection
Brush through well
Do middle parting
Part hair in 3 sections-> I on each side at the front for curling and one big one at the back which will be used for the bun
At the back: take a small section of the bun section (on the top) to incorporate later in the nest, section the small section into 2 and plait both of them tightly ; section bun section into 3 sections-> 1 big middle one to do a twist, left and right smaller ones which will be plaited (take them a tiny bit apart->look is supposed to look a bit messy) and will be later wrapped around the twist bun part; take middle section and create a  twist-> wrap it loosely around itself  to create a bun shape but pin it very tightly so it won’t fall apart!; then take left and right section and plait-> take a bit apart and wrap it around twist; try to create a big bun, secure with pins and try to hide them as good as possible(but if not it doesn’t matter that much as the model will wear a veil over it )
Go back to front: put hair spray in before curling-> better hold; curl front sections-> around 4 sections on each side, do nice ringlets; pin curls and leave them to cool down( maybe it would be the best to do the ringlets before doing the bun so they have enough time to cool down)
Place nest on the right side of the head(right side if you stand behind the person)and pin it in tightly-> add the 2 plaits into nest-> weave through the twigs  and pin them
Take pins out of the curls and comb them up to create messy curls
Apply a bit of baby powder to make hair look dry->not too much because the look is supposed to be not too long after her almost wedding
Place some  dried rose petals and leaves into the hair
Pin in the veil-> veil is covering all of her head and a bit of forehead


Without veil


Looking at the picture I realized that the water and grey pigment mixture was darker this time. But only a tiny bit. Also at the continuity assessment the run down tears look more defined than from the first shoot. The lips look more natural here as well. In the pictures from the first shoot they look more red.